


How to Sign up for Google Adsense account
Adsense by Google is the best paying ads program all over the world.

There are some requirements needed to sign up for Google Adsense account, these are; a) Your Gmail/or any Google account product account, (b) Password for the account.
2) Put your URL Address-:


When you login to your blogger dashboard, scroll down to theme. Click on "theme" to open. When it opens, Click on the "edit theme" button close to the customise button.
In the "edit theme" page, you will see your site's html src codes, click on "Jump to widgets" (this button is seen at the top of your theme src, direct close to the "Save theme" button.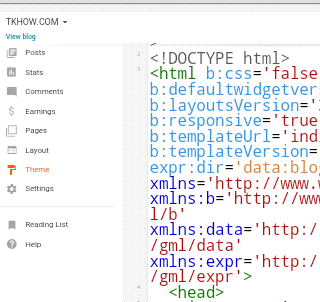
If you are able to locate the <head> tag, click on the ">" symbol, and press the "enter key" button on your Laptop/or Desktop's keyboard, to take you to a fresh page. On that fresh page, under the <head> tag of your blog's template, paste your copied Adsense code, click on "save theme" (to be on a safer side, click the save theme button two times).
When you are sure that your Google Adsense code is pasted on your blogger template, go back to your Google Adsense homepage, and click on "I have save code, and continue".
When you are done with these steps, a review will be made on your website immediately. If your Adsense code is not saved successfully on your blogger template, you will get a message notification, informing you that your Ads code is not seen/or that they were not able to locate your site.
If after you have pasted your Adsense code on your blogger template, and if you are not given a query like Your account was disapproved due to some reasons listed below-:
i) Navigation issue,
ii) Insufficient Content/or content violation,
iii) Your site can not be located,
Or
Any violation message whatsoever, you are on the go.
Note-: Review time may take less than 24 hours, but in some cases, it may take weeks. But be rest assured that when the review is completed and your site complies with Google Adsense policies, you are on the go.
Hope this article is helpful to you? Don't forget to ask me questions in the comment box, and I will be quick to help you out, in the area of confusion.
Good luck as you apply for Google Adsense today.

Google Adsense, is legally approved and it is highly recognized.
you can read on: what Google Adsense is the best ads network?
One good thing about Google Adsense is that the ads shown on your site/or shown on Google ads publishers are simply suitable to their site's content. And are welcomed and loved by their publisher's audience on their site.
You as a Google Adsense publisher can add/or block ads from showing on your site.
You can also paste your Adsense codes to any page of your choice, where you want ads to show on your site.
Before Google Adsense can be approved and activated on your site, there are some key things which you need to note and which needs to be fixed and considered on your site. Kindly read on those things you need to do on your website before applying for Google Adsense.
How to apply for Google Adsense?
Google is ready to do business with you, there are ready to move your online business website to the next level, by publishing and running ads on your sites.
What you have to do is to ensure that you have a personal domain name, as well as quality content on your site.
Interesting/and helpful to read-:
If the above is fixed and goes in line with Google Adsense policy, then let's proceed in creating Adsense account.
Steps to take on how to create a Google Adsense account
1) Sign up to Google Adsense homepage-:
2) Put your URL Address-:

This is where your personal domain URL comes in. The required URL to put in this page is your www.yourdomainname.com (and not www.yourdomainname.blogspot.com. or www.yourdomainname.wordpress.com).
3) Yours provide your email address for this account-:
The address can be your Gmail account (preferably), or any Google related account. In this place, a password is not needed. When you are done, click on the blue link written: "SAVE AND CONTINUE".
4) Log in to your Gmail account (this time around, the password is needed) to continue-:
In this spot, after you've completed step 3, you will be taken to the next step, where you will need to login to your preferred Gmail account for Adsense.
5) Provide your country and accept the Google Adsense policy:
You are expected to select your country. When you have selected your country, scroll down to read the Google Adsense policies, read them carefully and click the tiny button that says "I accept the Google Adsense Policies", then click on the "Save and continue" button to go to the next final stage (the copy and paste code your Adsense account homepage).
You are expected to select your country. When you have selected your country, scroll down to read the Google Adsense policies, read them carefully and click the tiny button that says "I accept the Google Adsense Policies", then click on the "Save and continue" button to go to the next final stage (the copy and paste code your Adsense account homepage).
6) Copy your Adsense code and paste it to your site's <head>-:
After the above steps are filled and submitted successfully, you will be taken to a new fresh page, which is your Google Adsense account homepage. Beneath the homepage, a code will be generated by the Google Adsense team, this code should be copied by you, and be pasted in your submitted URL blog's <head>, in your blog's template.
Note-: You can also paste this code in any of your site's pages, where you want Ads to show on your blog/or site. It is also important to note that; "The Ads code, should be pasted in the pages where your site receives frequent traffic".
For blogger users, the <head> tag is seen/or its located at your blog's template/or theme.

In the "edit theme" page, you will see your site's html src codes, click on "Jump to widgets" (this button is seen at the top of your theme src, direct close to the "Save theme" button.
If you are able to locate the <head> tag, click on the ">" symbol, and press the "enter key" button on your Laptop/or Desktop's keyboard, to take you to a fresh page. On that fresh page, under the <head> tag of your blog's template, paste your copied Adsense code, click on "save theme" (to be on a safer side, click the save theme button two times).
When you are sure that your Google Adsense code is pasted on your blogger template, go back to your Google Adsense homepage, and click on "I have save code, and continue".
When you are done with these steps, a review will be made on your website immediately. If your Adsense code is not saved successfully on your blogger template, you will get a message notification, informing you that your Ads code is not seen/or that they were not able to locate your site.
If after you have pasted your Adsense code on your blogger template, and if you are not given a query like Your account was disapproved due to some reasons listed below-:
i) Navigation issue,
ii) Insufficient Content/or content violation,
iii) Your site can not be located,
Or
Any violation message whatsoever, you are on the go.
Note-: Review time may take less than 24 hours, but in some cases, it may take weeks. But be rest assured that when the review is completed and your site complies with Google Adsense policies, you are on the go.
Hope this article is helpful to you? Don't forget to ask me questions in the comment box, and I will be quick to help you out, in the area of confusion.
Good luck as you apply for Google Adsense today.

Comments
Post a Comment
What do you think?